Setting Up SQL Server AlwaysOn Availability Group
On this part I'm going to show a demo on how to set up SQL Server AlwaysOn Availability Group on local computer.
First, we need to have virtual machines on our local computer because we need to spawn at least 3 VM servers that will be domain controller, SQL Server 1 (primary), and SQL Server 2 (secondary)
To do that, you need to install VMWare Workstation first (or any other tools for virtual machine), it can be downloaded for free from: VMWare
Also you need to have Windows iso, SQL Server iso, and SSMS installer. What I use:
Windows Server 2019 evaluation edition from Microsoft: Windows Server 2019 ISO
SQL Server 2019 Developer Edition: SQL Server Developer Edition Downloads (this, you need to login first because official SQL Server Developer Edition now can only be downloaded from Visual Studio website)
SQL Server Management Studio: SSMS
Notes: if you are planning to use SQL Server 2012 or earlier, you need to download .NET Framework 3.5 installer too because Windows Server will only have .NET Framework 4
Other things that need to be considered is that the minimum RAM on your local computer might need to be 16 GB, to host 3 VM simultaneously active
Here are the steps that I do to setup a simple SQL Server AlwaysOn Availability Group on my local computer. This might be a long installation procedures, so yeah, this might take your time.
1. First, you need to make 3 virtual machines in VMWare, I name it Domain_Controller, SQL01, and SQL02. Use the windows 2019 iso to spawn these 3 VMs and then run all of them to do windows server installation. (For disk space just give 60 GB each)
2. Make sure you install Windows Server 2019 successfully too all 3 Virtual Machines, the process might look like the picture above, this will take some time and at the end of process VM will restart.
Notes: If you fail to install, power off the VM, and change the VM setting and remove any floppy disk from the VM
3. After installation, login with your administrator account (which you created on the installation step) and then the first thing to do is change the name of your computer. To do this, go to system properties and then change Computer Name, do this for all 3 VMs, I named them DC01 (for domain controller), SQL01, and SQL02
(This is just in case not to forget to change the hostname, so it won't be something random like WIN-WETRS57R)
4. Now we need a domain for these 3 VMs and we host our domain inside domain controller VM. Inside DC01 VM, firstly we need to set on which IP we will host our domain, so go to Network and Sharing Center, and then go to network properties of and setup the IP. I use the configuration above for the DC01.
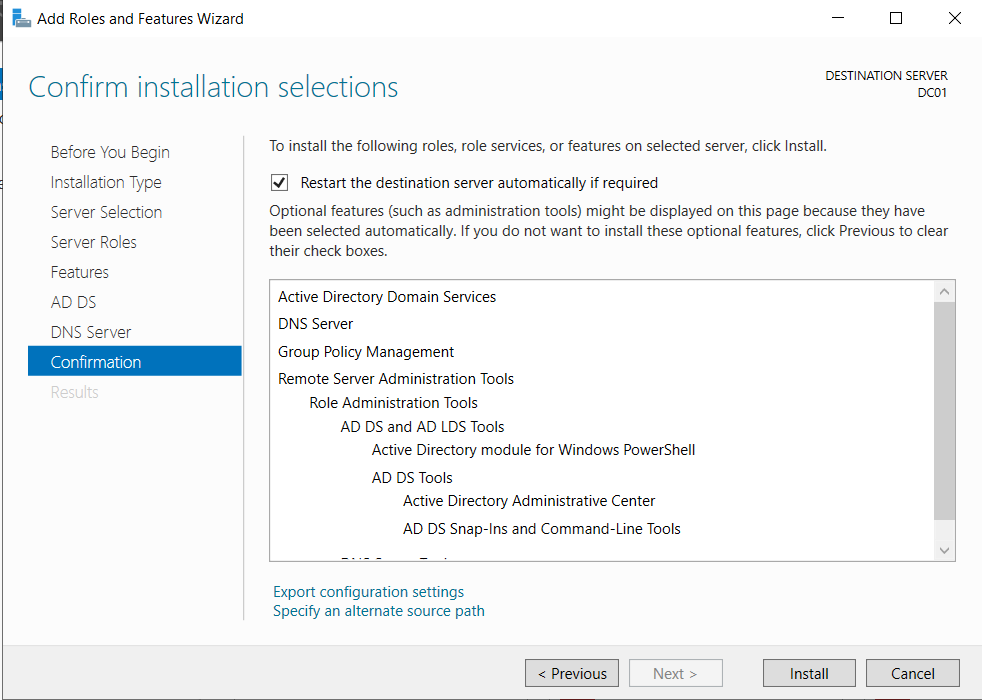
5. Now go to Server Manager and select the Add Roles and Features in the Tools toolbar in Server Manager. Now a new setup window will pop up and select these 2 server roles:
- Active Directory Domain Services
- DNS Server
6. Then proceed with Install and wait for the process to be finished.
7. After the installation process finished, now there is a notification at the Server Manager and select the "Promote this server to a domain controller"8. Now there is pop up window, in the Deployment Configuration select Add a new forest and then you need to specify the Root domain name, in here I use "test.lab" (you can name it with other name but in network name format)9. Next, in the Domain Controller Options select the Forest functional level and Domain functional level to Windows Server 2016, and then specify the password for Directory Services Restore Mode (DSRM)
10. After that, specify the NetBIOS Domain Name, this is according to the root domain name which you input earlier, example for me: test
11. Now just proceed with the installation and wait until the process is finished
12. After that, navigate to Server Manager again and then in the Tools section select DNS. A new DNS Server window will show up, navigate to the test.lab domain inside Forward Lookup Zones. Now on the right panel create new AAA host for 2 new instance:
First instance
name: sql01
ip address: 10.0.0.12
Second instance
name: sql02
ip address: 10.0.0.13
13. Next, navigate to Server Manager again and navigate to Tools and select Active Directory Users and Computers. We need to create a account that will be used in SQL Server installation, now create a new user inside the Users section. In here I create user 'sqladmin' in the test.lab domain
Okay, after that we finished setup the domain controller VM for now, next we are going to setup the SQL01 and SQL02 Windows Failover Cluster to host the primary and secondary instance for SQL Server AlwaysOn Availability Group
SQL01
IP Address: 10.0.0.12
Default Gateway: 10.0.0.1
DNS Server: 10.0.0.11
SQL02
IP Address: 10.0.0.13
Default Gateway: 10.0.0.1
DNS Server: 10.0.0.11
16. After that, now we need to join this instance VM to the domain that we created before, so in here I joined SQL01 and SQL02 to test.lab domain, using the domain user that we created, or the administrator domain user. You can to this in the system properties where we change the Computer Name before. (After the setup, the instances will restart)
17. Now login back to the SQL01 and SQL02 instance using the domain user that we created, in here I use test\sqladmin
18. Now, to setup AlwaysOn Availability Group, we need to setup Windows Failover Cluster first in the Server. To do this, go to Server Manager then select the Add Roles and Features, and then select features "Failover Clustering". Install this feature on the two instances, SQL01 and SQL02. (restart the server if it needs to restart)
19. Now go back to the domain controller server, and then open DNS (from Server Manager). Now in the domain test.lab create a new AAA Host for our failover cluster, give the IP address. In here I use:
host: clstr01
IP Address: 10.0.0.20
21. Next step is to input the name of the cluster, here I use "clstr01", bear in mind the name must not be too long so it won't affect the naming in domain system (max 15 characters). Also input the IP address that we assigned before for the cluster, here I use 10.0.0.20
23. After it is finished, then you will notice in the Failover Cluster Manager there will be clstr01, and if you navigate to the Nodes, there will be SQL01 and SQL02. Cluster configuration for SQL Server is now finished completely and we can start to setup the SQL Server AlwaysOn Availability Group.
24. Now the next thing to do is to install stand alone SQL Server (here I use SQL Server 2019 Developer Edition) on SQL01 and also SQL02. For complete installation guide, you can refer to my other post here: SQL Server Installation
25. For AlwaysOn Setup, SQL Server needs to have the same structure on the disk, even the drive letter (E:, F:, etc.), but because this is only for local dev/test environment I put all on C: Drive (which of course not a good idea for production environment).
Notes: I setup SQL01 and SQL02 to have directory inside a folder in C: called Database
26. After finished installing SQL Server now open the SQL Server Configuration Manager and then open Properties and enable Always On Availability Group, Restart the Service
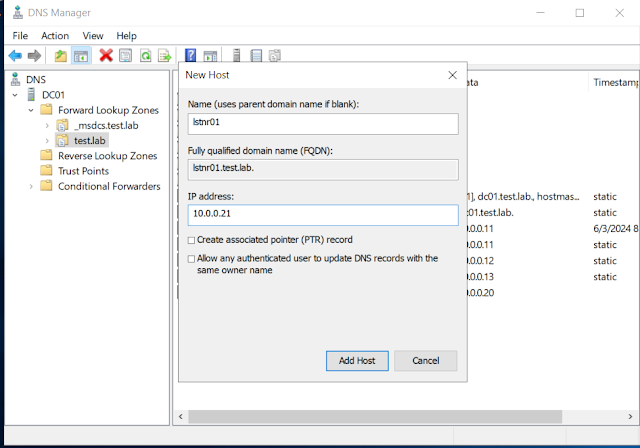
27. Now go back to DNS Server and create a new AAA Host for AlwaysOn Availability Group Listener:
Name: lstnr01
IP Address: 10.0.0.21
28. Next, login to SQL Server SQL01, the one that we have installed on SQL01 Server. Create a new database just for testing purpose, here I created a database called TestDB, and then create a test table inside the database. After that do a Full Backup for the database.
29. Now we are going to create an AlwaysOn Availability Group, navigate to the Always On High Availability, right click and then press on the New Availability Group Wizard option and a new window will pop up
30. Give the new Availability Group a name, here I give it "test-ag"
31. Choose the database that we created before
32. Now, on the replicas, add the SQL02 Server Instance and you can choose either it's synchronous and readable secondary or not.
Notes: if you cannot connect to SQL02 from SQL01, then turn off the firewall on each server, enable TCP/IP Protocol on each server, and then enable SQL Server Browser service on each server
33. Now on the Listener tab, choose Create An Availability Group Listener, input the name of the listener that we created before in the domain, here I use "lstnr01" with default port 1433, and the IP Address from before, which is 10.0.0.21
34. Now in the next step, just choose Automatic Seeding so the database will be created automatically in the SQL02 (secondary server)
35. Next, just continue and let the setup process begin, after everything completes, then you can notice that the database is in synchronized status, and there will be a new Availability Group in your SQL Server called test-ag
36. You can also check inside Failover Cluster Manager, there will be a new role added, which is the new AG, test-ag
Now everything has finished, and you have successfully created a SQL Server AlwaysOn Availability Group to host a Database in primary and secondary server


Comments
Post a Comment